Smart Ways to Format a Hard Drive: Effectively Optimize Space in 2025
Understanding Hard Drive Formatting
When it comes to managing your digital storage, understanding **how to format a hard drive** is essential for keeping your data organized and your system running smoothly. Hard drive formatting prepares the disk surface for data storage and is critical for maximizing performance. There are generally two types of formatting: **quick format** and **full format**. A quick format erases the file system and makes the disk ready for new data, while a full format checks for errors and clears existing data. This guide aims to explore the various methods for formatting, focusing on external and internal drives, as well as the file systems used, such as **NTFS**, **exFAT**, and **FAT32**.
Full Format vs Quick Format
Deciding between a **full format hard drive** and a **quick format hard drive** depends on your needs. A full format takes longer but checks for bad sectors and ensures the drive is in good condition, which can be particularly useful for older drives or those you’ve acquired second-hand. In contrast, a quick format saves time and is optimal when speed is a priority, such as preparing a drive for a new operating system or temporary storage. Understanding the implications of each format type can streamline your workflow and enhance the overall usability of your hard drive.
Choosing the Right File System
When formatting a hard drive, choosing the correct **formatting file system** is crucial based on how you plan to use the drive. **NTFS format hard drive** is ideal for Windows users due to its support for large files and robust permissions features. On the other hand, **exFAT format hard drive** is excellent for those who need compatibility across different operating systems like Windows and macOS or want to use it with devices like gaming consoles and cameras. Alternatively, if your storage needs are smaller, such as transferring files, you might consider **FAT32 format hard drive**, though it does come with file size limitations.
Step-by-Step Hard Drive Formatting Guide
Formatting your hard drive can seem daunting, but it doesn’t have to be. Below, I will outline a comprehensive **hard drive formatting guide** that can be applied to various operating systems. Whether you’re working with a **format external hard drive** or an **internal hard drive**, this guide will walk you through the essential steps to ensure a clean and smooth formatting process.
Formatting a Hard Drive on Windows
To **format hard disk Windows 10**, you can use the built-in Disk Management tool. Start by right-clicking the **Start menu**, selecting **Disk Management**, and then locating your drive in the list. Right-click your desired drive and select **Format**. Choose your file system format and options based on your needs. If you want to use the drive for system backup, consider **NTFS**. Click OK to proceed. This is a great way to manage your drives efficiently without the need for third-party software.
How to Format a Hard Drive on Mac
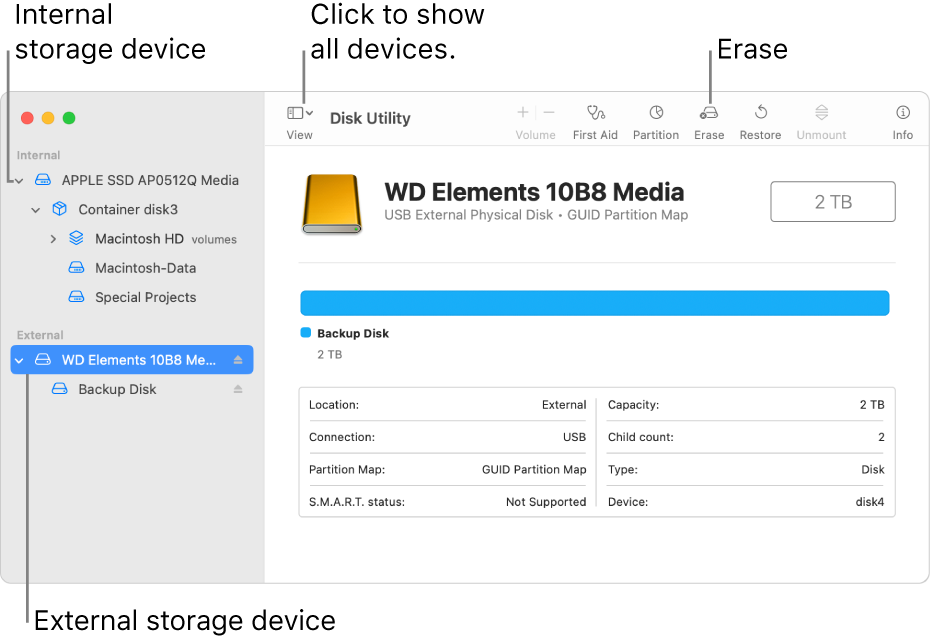
For Mac users, formatting a hard drive requires the use of **macOS Disk Utility**. Begin by opening the Disk Utility application from the **Utilities** folder. Select the drive you wish to format from the sidebar, then click on the **Erase** tab. Choose the file system, renaming the drive if necessary. It’s always good practice to back up any important data before proceeding with a format, as once reformatted, data recovery can become challenging.
Using Command-Line Tools for Formatting
If you’re familiar with command line interfaces, you can instead opt for **format hard drive command prompt** on Windows. Open Command Prompt with administrator rights and use the DiskPart utility to select the drive. Commands such as “list disk,” “select disk [number],” and then “format fs=ntfs quick” can efficiently format your drive. This method is beneficial for advanced users looking to automate their workflow or in scenarios requiring batch processing.
Troubleshooting Common Formatting Issues
Even with the right tools, you might encounter issues while formatting your hard drive. From corrupted sectors to faulty drives, understanding how to diagnose and troubleshoot these problems is crucial for any user. The next sections will highlight common formatting errors and how to address them.
Formatting Errors
Formatting errors can arise for several reasons, including disk corruption or incorrect file system choices. If you receive an error message when attempting to format a drive, start by running a **disk repair** using built-in tools like **chkdsk** on Windows. This command checks for health issues and could resolve problems that prevent formatting.
Dealing with a Corrupted Hard Drive
If you suspect a hard drive is corrupted, it’s crucial to use **disk repair tools** first. For Windows users, running the **Disk Management** tool or utilizing command prompts like “clean” can reset the drive. Conversely, Mac users can resort to verifying and repairing the disk with Disk Utility. If software solutions do not work, data recovery software might be necessary to recover crucial data before a clean format.
Best Practices for Formatting Drives
To optimize your hardware and ensure data integrity, following best practices while formatting drives is inevitable. Ensure your data is backed up adequately before formatting, as the action erases existing information. This section will delve into the recommended practices for both personal and professional applications.
When to Format a Hard Drive
Understanding **when to format a hard drive** can extend its lifespan. Typically, formatting is recommended before setting up a new operating system, during a significant upgrade, or if you’re selling or transferring ownership of a drive. Regular formatting can help manage storage issues over time, particularly with older disks that may slow down or are facing file system errors.
Securing Your Data Before Formatting
Always prioritize data security by ensuring you have complete backups. **Recovering data after format** can become tedious and sometimes impossible. Consider using data recovery solutions that align with your formatting needs, especially when preemptively preparing for wipes or selling devices.
Key Takeaways
- Choose the right type of format (quick vs. full) based on your needs.
- Understand the importance of the file system for compatibility.
- Select the right tools and follow best practices to avoid common formatting issues.
- Backup essential data before formatting to secure information.
- Be proactive with disk maintenance to extend the life of your hard drive.
FAQ
1. What is the main difference between quick format and full format?
A **quick format** only erases the file system and prepares the hard drive for new data, while a **full format** checks for errors and marks bad sectors, making it a more thorough option. The choice depends on whether you’re pressed for time or ensuring data integrity and drive health.
2. How do I format my hard drive for use with gaming consoles?
To **format hard drive for PS4** or for Xbox, use the console’s settings menu, which allows you to initialize the drive. The console typically formats the drive in the required file system to ensure compatibility. Ensure all important data is backed up before formatting.
3. Can I recover data after formatting a hard drive?
Yes, it’s possible to **recover data after format** using specialized software. However, success can vary depending on how much new data has been written to the drive since it was formatted. Always try to restore data from the hard drive immediately after formatting.
4. How do I format a drive in Linux?
To **format hard drive in Linux**, you can use the `mkfs` command in the terminal. Choose your file system by specifying the command, such as `mkfs.ext4 /dev/sdX` where “X” is the disk you wish to format. Always ensure you have the right path, as formatting incorrect drives can lead to data loss.
5. What should I do if I encounter formatting errors?
If you face formatting issues, first try using disk repair tools like **chkdsk** on Windows or the **Disk Utility** on Mac. If that fails, consider more advanced tools like data recovery software to manage or rectify underlying issues.