How to Record Screen on Windows 10: Effective Ways in 2025
Using Windows 10 Built-In Screen Recorder
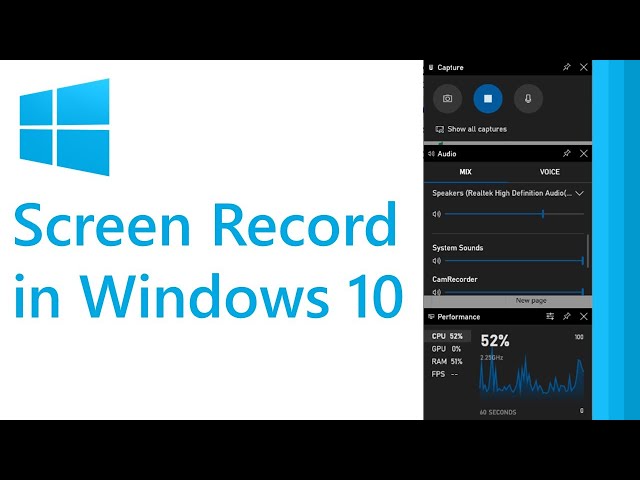
If you are looking to **record screen on Windows 10**, exploring its built-in features can be a great start. The Windows 10 built-in screen recorder is primarily accessed through the Windows Game Bar, designed for gamers but beneficial for all types of screen recording tasks. To activate it, you simply press Windows + G. Once launched, the Game Bar provides a slew of **screen recording options**, including the ability to capture video, take quick screenshots, and adjust settings. Not only can you record gameplay, but you can also use it to **capture screen video** during tutorials or presentations, making it a versatile tool.
Navigating the Windows Game Bar
The first step in **how to use Game Bar** effectively is to familiarize yourself with its interface. After pressing Windows + G, you will see a floating bar that includes buttons for recording, taking screenshots, and accessing various settings. To start recording, click the circular record button or press Windows + Alt + R. This triggers your screen recording session. After you finish, click the stop button, and your video will be saved in the default Videos > Captures folder. This utility performs well for basic recording needs, allowing you to **record your screen** easily without needing additional software.
Adjusting Screen Recording Settings
Before embarking on your **screen recording project**, it’s crucial to optimize the screen recording settings. Within the Game Bar’s settings, you can select options to enable or disable audio recording through your microphone. This is particularly useful if you need to record voiceovers along with your screen **recording with audio**. Additionally, ensure your system meets the requirements for high-quality **HD screen recording**. By fine-tuning these settings, you can achieve a more satisfying and professional output for your videos.
Exploring Third-Party Screen Recording Software
While the built-in Windows 10 features are useful, **screen recording software** can significantly enhance your capabilities. There are numerous options available, whether you’re looking for free tools or more sophisticated software. Programs like OBS Studio, ShareX, and Camtasia provide extensive features for **recording computer screens**, editing, and sharing your videos. These tools often come with advanced functionalities, such as the ability to create **screen recordings with multiple screens** or include a webcam feed in your recordings.
Best Screen Recorders for Various Needs
Choosing the right **screen recorder** depends on your specific requirements. For lightweight and straightforward tasks, **free screen recorder** apps like OBS Studio are excellent for beginners. They allow for high-quality **screen capture for presentations** and are open-source, thus free of charge. On the other hand, if you’re looking for advanced editing features, a paid program like Camtasia is more suitable. These applications often come integrated with **video editing software** that allows you to **edit screen recordings** and add effects easily, making them suitable for complex projects like tutorials or webinars.
How to Record Gameplay on Windows
For gaming enthusiasts who want to **record gameplay on Windows**, several tools cater specifically to this demographic. The Windows 10 Game Bar is a natural choice, but software like Nvidia ShadowPlay offers options like instant replay and broadcasting features. To record gameplay, ensure your specific game is captured by adjusting the settings within your chosen program. Furthermore, while recording, keep tabs on your frame rates and performance to ensure a smooth experience. It’s imperative that your computer can handle extensive recording, especially when playing graphics-intensive games, to avoid lag and other issues.
Capturing Screen Video for Professional Use
In a professional setting, effectively **creating screen recordings** can significantly boost productivity and knowledge sharing. Whether you are recording lectures, software tutorials, or corporate meetings, employing good **screen recording techniques** is essential. For this purpose, using **screen capture tools** that allow for annotations and highlighting features can elevate your presentations and help convey your message more effectively.
Recording Tutorials and Webinars
**How to record tutorials** effectively begins with preparation. Outline your points and test your tools beforehand. Utilize tools that allow you to capture your screen asynchronously while add voiceover capabilities. This method not only helps with clarity but also keeps viewers engaged. Review https://wizhelp.info/?p=143 for detailed steps on recording webinars and creating instructional materials using various technologies tailored for educational use.
Advanced Recording Features
When diving deep into **screen recording programs for Windows**, explore functionalities such as editing capabilities. Advanced recorders often allow for trimming, adding transitions, and voiceovers, creating polished videos post-recording. When collaborating or sharing content, tools like Snagit are tailored for **annotating screen recordings**, making them an effective choice for team projects. You can check https://wizhelp.info/?p=138 for different online screen recording tools to facilitate team interactions seamlessly.
Tips for Enhanced Screen Recordings
To make the most out of your **screen recording** endeavors, keeping a few tips in mind can prove beneficial. Ensure your workspace is tidy to prevent distractions in your recordings. Proper lighting and a noise-free environment can drastically improve audio-visual quality. Keeping recordings concise and to the point enhances viewer engagement. By integrating these strategies, you can effectively maximize the impact of your tutorials or presentations.
How to Edit Screen Recordings
After capturing your content, the next crucial step is **how to edit screen recordings** efficiently. Simple edits like trimming out unnecessary sections can make your videos feel professional and tight. Software such as Adobe Premiere Pro or even free tools like Shotcut provides ample features for layering sound, while offering various formats for export ensuring your videos are tailored for sharing across platforms. Proper organization of video files post-capture also makes it easier to salvage or alter content later.
Sharing Recorded Content
Selecting the appropriate platform for sharing your **recorded videos** greatly influences your outreach. Popular video sharing platforms, like YouTube or Vimeo, are excellent for reaching a broader audience, especially for tutorials and educational materials. Ensure your recorded videos are in compatible formats and optimize them for search engines, utilizing relevant keywords so interested audiences can find your content easily.
Key Takeaways
- Utilize the built-in Windows 10 screen recorder for quick and basic captures.
- Explore third-party software for advanced editing capabilities.
- Maintain a professional output through good presentation techniques.
- Edit recorded videos for clarity and engagement.
- Share your content on accessible platforms to maximize viewership.
FAQ
1. What is the best screen recorder for Windows 10?
The best screen recorder largely depends on your needs. For straightforward recordings, the Windows Game Bar is competent. For advanced features and editing functionalities, tools like Camtasia or OBS Studio are excellent choices due to their flexibility and range of options available in **screen recording software**.
2. How do I record gameplay on Windows?
To **record gameplay on Windows**, use the built-in Game Bar by pressing Windows + G and clicking the record button. Alternatively, specialized software like OBS Studio or Nvidia ShadowPlay can be leveraged for better gameplay recording experiences.
3. Can I record my screen with audio?
Yes, most screen recording tools, including the Windows Game Bar, support **recording audio and screen** simultaneously. Ensure to toggle the audio settings before you start recording.
4. How do I edit my screen recordings on Windows?
Editing screen recordings can be done using video editing software such as Adobe Premiere Pro, or simpler free options like Shotcut. You can trim, add effects, and layer audio tracks for more engaging videos.
5. Where can I share my screen recordings?
You can share your **screen recordings** on various platforms like YouTube, Vimeo, or social media channels. Ensure that your videos are optimized for the respective platforms for broader audience reach.